Powercopy Version 4.2 (July 2007)


| Datapower GbR, www.datapower.de |
| Powercopy Version 4.0 - User's Guide for physical copying
of hard disks and creating images |
1. General Functional Description
[Top Of Page]
Among the various functions available, Powercopy also allows the physical
backing up of entire hard disks and single partitions, including creating
images on a sector-by-sector basis. Powercopy is easy to use due to its
unique process-guided user interface.
Powercopy enables you to copy with all operating systems (DOS, WfW, Windows
9x/ME, NT, Win2000, XP, LINUX, UNIX, OS/2 ...).
There is a total of three backup functions, three transfer methods and three backup techniques (volume types), plus a variety of individual functions available:
Backup/clone methods:
- Creation of images - All sectors of a selected hard disk or a partition/partition area are compressed and saved as a so-called image file on another hard disk or other partition. This image file will then again be decompressed if restored at a later time on the original (or any other) hard disk, so that all data on the hard disk will be restored to the original status
- 1:1 Clone of a hard disk - The hard disk is copied (cloned) bit by bit onto another hard disk, so that the computer can be booted from the new disk (if it also contains the operating system). A restore is also possible.
- Creation of a secured backup with restore function
- Using this copying method, a hard disk is backed up 1:1, just
as in the case of the aforementioned method. However, this time the
backup is offset by the initial ten sectors, i.e., the first sector
of the backup hard disk (target hard disk) is marked as backup, and
data are stored on the other sectors which will protect the hard disk
against logical overwriting.
Advantage: With this type of backup method, Powercopy protects your hard disk, which has not been marked, from being unintentionally overwritten. The backup hard disk is not bootable, by intention, and is thus protected against unauthorized usage (e.g. by an operating system). This backup type is designed as an alternative for PC systems in an industrial environment that requires a high degree of data protection. - Backup type
- You have three options to influence the copy amount:
a) Copy all - Function "S" - Using this method, Powercopy copies both the allocated and the non-allocated areas of a hard disk or partition; advantage: This method is independent of the operating/file system and performs a backup even if a new operating/file system is used.
b) Copy all but "wash" the free areas in advance - Function "W"- Using Power Copy, you may from time to time or in advance "wash" the data trash collected on the free areas. In doing so, simple and thus highly compressible characters are written which will markedly reduce both the data volume and copy time.
c) New in V4; copy only the allocated areas - Function "T " - Using the cluster analysis method, only the allocated areas of a hard disk or partition will be backed up, independent of the respective file system used (FAT, NTFS,...).
This is the fastest method and is best to use in the case of a hard disk or partition being only partially allocated (up to approx. 70 percent).
We recommend that you perform a Scandisk before you use this backup type to ensure that the partition to be copied is flawless.
 |
 |
 |
For all copying methods a subsequent or separate comparison between the source hard disk and the data on the target hard disk is possible. This feature is indispensable for modern and safe data storage. |
The following Review Table shows the core functions of the large
number of individual functions of the various program versions:
http://www.datapower.de/english/v/licencem.htm
The Demo Version will run at full speed, but there will be
demo interrupts and delays during a copy operation.
It may be used only for evaluation purposes.
Backing up or restoring (Restore) a hard disk image or partition
image must only take place under DOS (MS-DOS, Free-DOS) or
by using a Windows Boot CD if it would overwrite the currently active
operating system. The backup may be performed both user-supported
(dialog) as well as in batch operation.
The transfer speed for a local backup within one computer is dependent
on the speed of the installed hard disks. Normally it can
be assumed that Powercopy can make a backup at a rate of approx. 70 %
of the so-called Burst(maximum) transfer rate (dependent on hard disk
controller).
The image is created by using the latest state-of-the art packing technology
at extremely high transfer rates!
A backup via the PC direct cable link is limited to a maximum possible data transfer rate of a gross total of 1.5 Mbytes/sec when using the parallel interface.
After a hard disk has been backed up, an integrated read-after-write mode of operation may be performed either immediately or in a separate process in order to ensure that all data are correctly written. Further parameters may be turned on or off.
Powercopy provides a range of additional important safety features, especially in the "Backup" or "Restore" Modes and Image creation process to prevent unintentional overwriting. Nevertheless you need to be very careful in using this tool since data are overwritten physically (sector by sector), and not logically. This means that if the tool is not properly used, all data on the target hard disk will be lost.
Important notes:
- It is essential that you first read the detailed User's Guide for Backing up Hard Disks as well as the Licensing Terms before you make productive use of Powercopy.
- Datapower GbR does not accept any claims whatsoever for indemnity, in accordance with our licensing terms,
- It is highly recommended that you perform some test runs to ensure
your system meets the requirements.
If you have hard disks of less than 8 GB capacity, make sure they are of the same geometry when using these for a backup (refer to sub-section 1.1 System Requirements). - Make sure you select the correct backup functions (Functions Menu).
- Make sure you select the correct target hard disk when using the "Copy
hard disk" function!
To see the drive letters which are assigned to the respective physical disk drive, proceed as follows:
Win9x/ME: Start ->Settings -> Control Panel -> System ->DeviceManager -> DiskDrives -> <select disk> -> Properties -> Settings
Windows 2000/XP/Vista: Start -> Run-> <Enter diskmgmt.msc>
Windows NT: Start->Programs->Administrative Tools>DiskAdministrator
or use CTRL+F8 within Powercopy pc32.exe
- The drive letters in a Windows operating system may differ from that of a DOS operating system. This is especially important to bear in mind when restoring an image file under DOS. From Powercopy version V2.1Ri on, we implemented a feature to show the (NT/2000/XP..) Drive Mapping.
- It is assumed that a suitable backup system exists if you use the backup function as an integral part of your system and data backup (e.g. Grandfather-Father-Son principle).
- This procedure applies only to DOS: Normally code numbers 1 through 3 should be selected in the Boot Menu; in the event that booting will not be possible in this case, then the alternative parameters 4 through 6 should be selected.
- If you wish to accelerate the copying process considerably, you should
select the FAST backup mode, in which only the allocated sectors are
saved. It is important that you carry out a Scandisk before you use
this copy method to see if a virus or any other system may have destroyed
your file system. It is only in this manner, that your data will be
saved in such a manner as to be 100 percent available when doing a Restore.
However, you may also use the "wash" method (refer
to Function Control Code "W") by selecting "wash before
backing up". Here the data trash is written onto the free areas
of a drive disk with highly compressed characters. The partition is
saved bit-by-bit 1:1 and is almost as fast as the Turbo method in the
case of a > 70 percent allocation and besides that, it is independent
of the operating/file system used. This is particularly of an advantage
if you switch to a new operating/file system since this copy method
is independent of these different systems.
- When creating an image file, make sure that, if at all possible, this file will not be saved on the same hard disk for runtime reasons and that enough storage space will be available. If you wish to determine the size and runtime for creating an image file, select Function Control "F" and "D" respectively.
- When doing a Restore, booting must be performed via the DOS boot CD/FD/Memory
Sticks only if your Start operating system is located on the backup
area.
Any other Windows Live Boot CD(XP/2003Server/Vista) can be used in this case too.
-
For reasons of runtime, and because of a self-overwriting or self-backup risk (e.g. source 'hard disk partition C:' Target images also C:\<Path>\<Image name>) saving of images should always take place on a SEPARATE medium. This may be a second hard disk, an external hard disk or a hard disk on another computer (network, second computer via PC direct cable connection). - You may use HELP key F1 for the respective sequential steps!
- For selecting the various functions, you may either use the arrow
keys, enter the initial letter or the number or (only on WinNT,
2000, XP) left-click with your mouse and then make your selection
with a double-click.
After the selection has been made, you may confirm this selection by pressing a Function key as requested, a letter, the RETURN key or by right-clicking your mouse. - Switch language: With the F5 Function key, you may change the language in the Functions Menu, such as from English to German or vice versa.
- "Extended Partitions" may also be copied as entire "extended partition".
1.1 System requirements for physical backup of hard disks [Top Of Page]
- Operating systems supported: MS WfW, Win9x, ME, 2000, NT, XP. (Free DOS is an integral part of the Powercopy Boot CD)
- If you wish to use Powercopy's PC direct-linkage feature, a Powercopy cable is required, which is an integral part of Powercopy Professional PLUS and Multi-CLONE versions.
- Backing up hard disks by the use of Powercopy is basically independent of the computer, operating system or file formats used (All standard file systems, such as FAT16, FAT32, NTFS or Raid levels 0, 1, 2 ,5 are supported.)
- For the sake of performance, USB2.0 is required, when using external
USB2.0 hard disks. If not available, we recommend Add-On Controllers
with NEC chipsets.
Additionally, only if you use the Powercopy DOS Boot CD: Interrupt 13 extended access, which is a feature of all PCs manufactured since 1994When using our network function, a network environment with TCP/IP or NETBIOS must be available.
Supported Storage media (target media to save image files):
- internal or external hard disk drives such as P-ATA (IDE), S-ATA, SCSI, IEEE 1394 (FireWire), USB 1.0 / 2.0 or PC-Card devices.
- Network sharing
- CD-R (RW), DVD+/-R(RW) requires installed third party DVD Burning software.
- ZIP®, Jazz® and other removable media
2. Installation/De-installation of Powercopy [Top Of Page]
A CD featuring two functions is included in our Powercopy delivery package.
- Installation of Powercopy
- Booting in DOS or booting from any Windows Live-Boot-CD: You will need this function if you have to perform a backup or restore operation of entire hard disks or partitions on which operating system components are stored.
Installation of PowercopyRun Powercopy without any Installation!
Within Windows NT4, 2000, 2003, PE, XP or VISTA Powercopy can be run even without to install.
Copy the Powercopy executable file pc32(.exe) into a folder which you should name 'PCopy'. E.g. on an USB flash memory device. Then you can start Powercopy directly from this device. At Windows Vista you must start Powercopy by click right on pc32.exe file and select - "run as administrator " there.Within Windows 95 98 ME Powercopy can be run even without to install.
Copy the Powercopy executable file pc.exe and pc.msp into a folder which you should name 'PCopy'. E.g. on an USB flash memory device. Then you can start Powercopy directly from this device.If you are using the Powercopy spezial cable for the parallel printer interface port , than you should install Powercopy as described below.
- Insert CD (If the installation process does not start automatically, right-click CD drive)
- Double-click on "p_inst-...." and follow further instructions.
- Powercopy can then be started with a double click from the "Powercopy" directory on pc.exe (for 16-bit OS) or on pc32.exe (for 32-bit Operating Systems).
Important note regarding Powercopy start-up procedure
Set up Powercopy Quick Launch:
This option is available only on 32-bit operating systems (e.g. Windows NT4, 2000, XP, Vista).Start Powercopy once by clicking on pc32.exe in Windows Explorer
The Functions Menu will appear. Press "Ctrl + F6" and an options window will pop up. Confirm 'D S C' by pressing enter.
You may then call up Powercopy any time by simply pressing Ctrl+ALT+P.De-Installation of Powercopy:
Remove by clicking (Control Panel) "Settings / Add/Remove programs / Powercopy File x-fer Program".Starting of Powercopy: The following options are available for starting Powercopy:
the CD that was part of your package received
Important: If your hard disk has been formatted with NTFS, DOS does not not recognize the hard disk/partition! For detailed Start-up instructions, see PointOperating instructions
The dialog entries ( with Cursor) may be performed using the arrow keys, a mouse click or by direct entering the code numbers/letters! Watch out where the cursor is located!
For help, press the F1-key!Powercopy features currently both "German" and "English", both being called up by the F5-key!Press "Alt+F4" to abort Powercopy.
3. Main Procedure for all Backup Processes [Top Of Page]
Basic procedure
The information to be entered when performing a copy operation should always be according to the following procedure:
- Select backup mode in the Functions Menu
- Select source (hard disk, partition or image file)
- Select target (hard disk, partition or image files)
- Specify backup parameters
- Start backup operation
3.1 Main procedure using MS Windows operating system
Powercopy may be run on all current MS PC operating systems (from Win 95x up to XP) as well as in DOS or OS/2. Following is a description of the various steps to be followed, when using a Windows system. In DOS mode the logical sequence is almost the same!
 |
3.1-A: Example for a 1:1 copy of an entire hard disk [Top Of Page] |
The new Powercopy version features a unique process-guided user interface (dialog control).
If you select the desired copy mode in the Functions Menu (e.g. creation of a partition [drive letter] image, then you will be guided by Powercopy in such a way that it will be rather easy for you to back up hard disks and partitions absolutely safely.
All dialogs enable you to get help by pressing the F1-key!
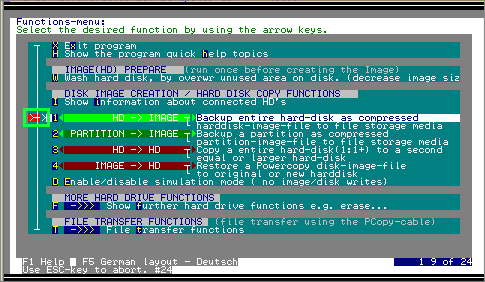
You will find the following menu bar In the upper part of the dialog window:
The current process step is marked in blue and the operation to be performed in yellow color with light-blue underscore.
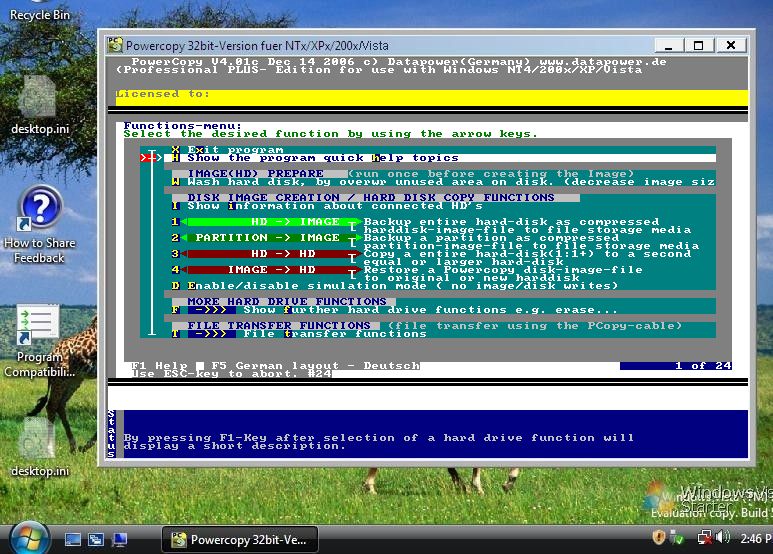
The basic procedure of each copy process is as follows:Start "Powercopy" in the Powercopy directory by double-clicking on pc32.exe in the case of 32-Bit operating systems (such as Windows XP) (or by direct command by pressing the Ctrl+F6 keys, if you activated this feature [see Point 2 "Important note regarding Powercopy start-up procedure"]) and Pc.exe respectively for 16-bit operating systems (such as Windows 98).
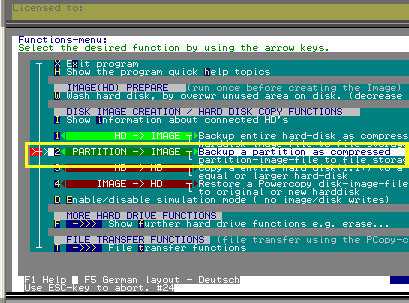
Select desired backup mode in the Functions Menu:
(Screenshot shows Powercopy started in Windows Vista )
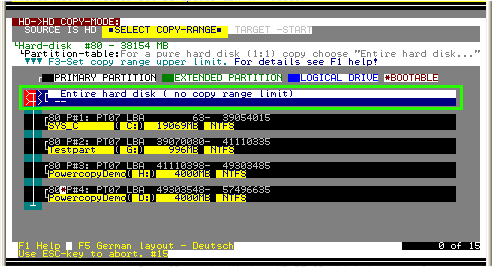
Example: Select "3 - HD -> HD" (back up an entire hard disk 1:1) by moving arrow keys; look at location of red cursor!
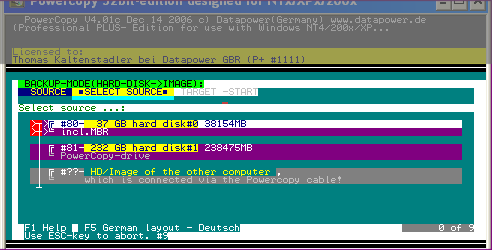
An overview of the hard disks connected will appear: select source hard disk;
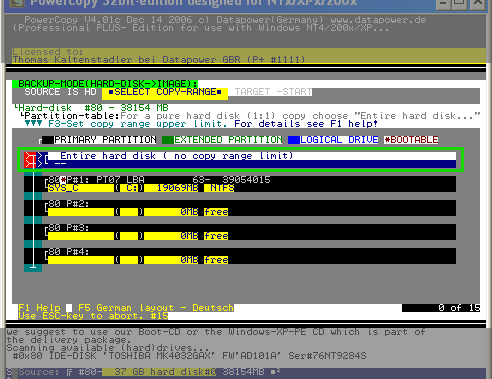
An overview of the partitions (drive letters) of the hard disk selected will appear; in the case of a 1:1 backup operation, the partition overview will appear to check if the proper source harddisk was selected.
This process has been designed to make a 1:1 back up of the hard disk, making it impossible to select an individual partition!
If OK, press ENTER.
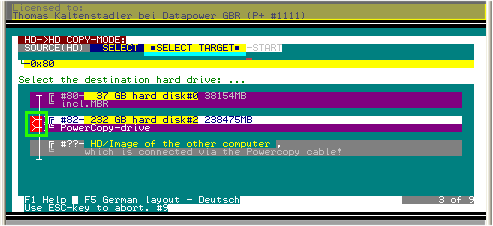
Select target(destination) disk drive
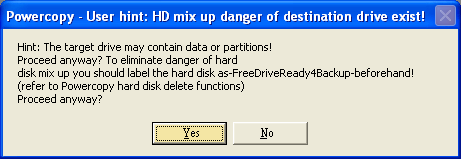
If destination disk drive is not empty(new) an additional Warning message will be displayed!
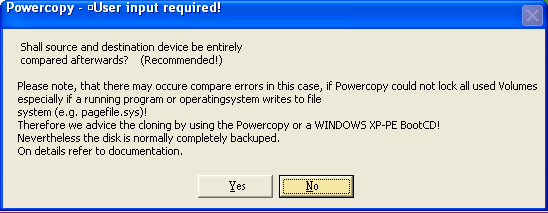
The window "100 % check to be conducted?"; if the comparison check is to be conducted, press "Yes";
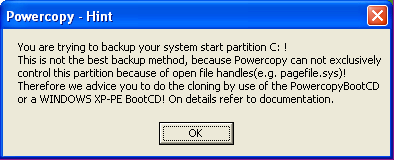
Important: If you clone your current active running Windows System press "NO"
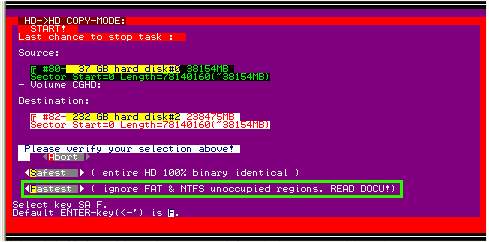
A Window entitled "Last chance to stop task" program appears;
"check the entries made" (source, target);
when OK, press 'F' (Fastest)
DOS-Version of Powercopy pc.exe does not provide 'Fastest' option use 'S' instead.
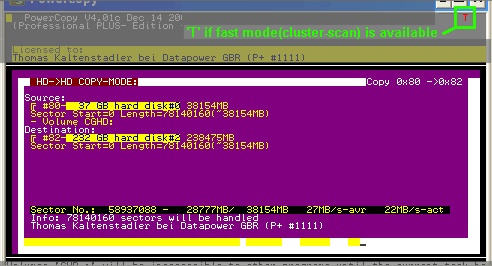
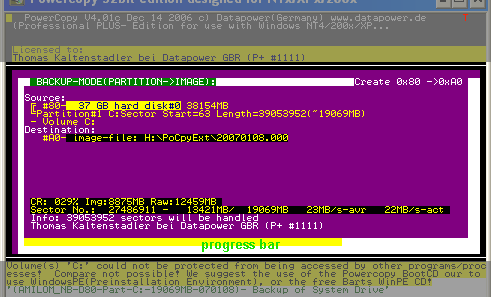
The window showing the current copy progress dialog will appear:
The backup progress is shown at the lower end of the window by way of a yellow bar and the comparison
progress by a green bar.
End of backup process: "OK" will appear, or "ERROR"; if any error occured, refer to "A"
(Show the program quick help topics);


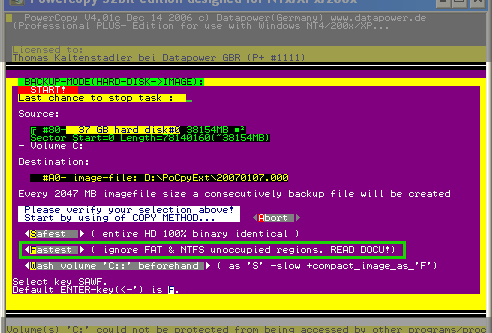
| 3.1-B: Example for the creation of images of an entire hard disk ( Full System Backup ) [Top Of Page] |
- For starting Powercopy, see sub-section 3.1
Select desired copy mode in Functions Menu:
Select "1 - HD -> Image"
(back up entire hard disk, i.e. an entire hard disk is to be saved as image-file in compressed form).
An overview of the hard disks installed will appear:
Select the hard disk to be backuped.
The overview of the partitions (drive letters) of the hard disk selected will appear; since menu point 1 "entire
hard disk" was selected, the following overview of partitions is only for information!
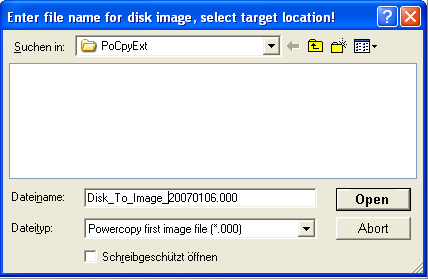
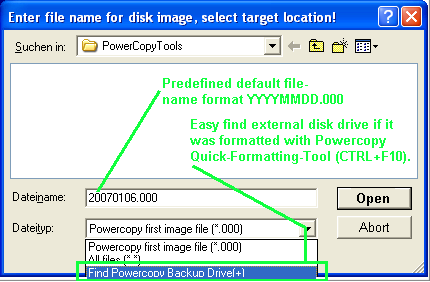
A Browser window will appear; select target; select directory onto which the image file is to be saved:
You may change the suggested file name at will, here <YYYYMMDD>.000 ,
then click on "open".
Tip: Use dropdown item 'Find powercopy Backupdrive(+)'
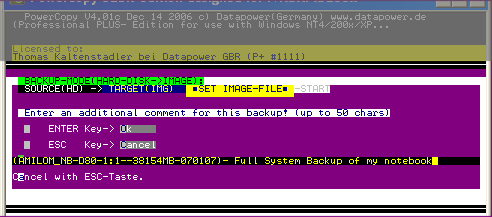
A window will appear "enter additional comment"; take over proposal
- or add additional comment:
If you backup your current active running Windows-system this message will popup!
If it popup's, select NO compare at the compare-option dialog.
The window "100% comparison check to be conducted?"; if so, click on "Yes"
Important: If you clone your current active running Windows System press "NO"
The window "Last abort option" will appear; check the entries made
(Source - target); if everything is OK, you may select one of the following copy modes:
- "S" Copy all sectors, allocated or non-allocated, 100% bit-by-bit and independent of operating/file systems;
- "F" New in V4 Turbo-fast - in this case only the allocated sectors are saved, depending on the corresponding
file systems (such as FAT, NTFS..) used; We highly recommend that you perform a Scandisk before you
use this mode, to ensure that the partition to be copied is free of errors (only available for the Pc32.exe version)- "W" Before the copy process is started, the data trash of the free areas is overwritten with characters resulting in a runtime close to
copy mode "T", although a 100% bit-by-bit method backup mode is performed (If the percentage of allocated areas > 70%);If you fail to enter anything, Powercopy will select Copy mode "F".
By entering the copy mode, the backup process will start.
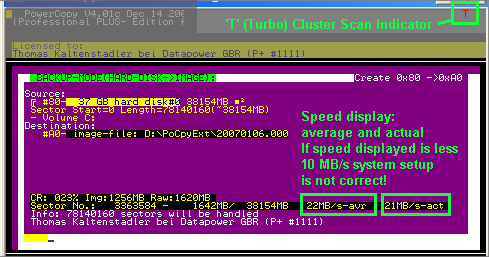
A window showing the current backup dialog will appear:
End of backup process: "OK" will appear, or "ERROR"; if any error occured, refer to "A"
(Show the program quick help topics);
 |
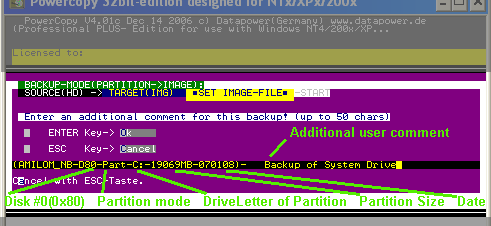
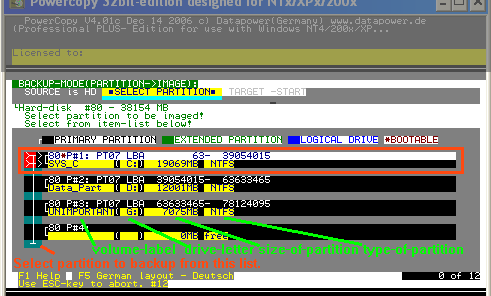
3.1-C: Example for the creation of images of a partition (drive letter/volume) [Top Of Page] |
Enter '2' to selsect Function "2 Partition to Image"
Use UP/DOWN-key followed by ENTER(Return)-key or double click on list item.Select disk on which partition to backup is located.
The boot Partition 'C:' is normally located on the first drive(#80).
After selecting the source hard disk, a window will pop up showing how the hard disk is divided up into the various partitions.Choose a partition (drive letter), for example: LW C (P#1...). In so-called "extended partitions" several partitions are combined. Here you may select either the entire "extended partition" or the associated individual partitions (drive letters).
A Browser will appear; select target; select directory onto which the image file is to be saved:
You may change the suggested file name at will, here <YYYYMMDD>.000 ,
then click on "open".
Tip: Use dropdown item 'Find powercopy Backupdrive(+)'
- A window will appear "enter additional comment"; take over proposal
or add additional comment:
If you backup your current active running Windows-system this message will popup!
If it popup's, select NO compare at the compare-option dialog.
The window "100% comparison check to be conducted?"; if so, click on "Yes"
Important: If you clone your current active running Windows System press "NO"

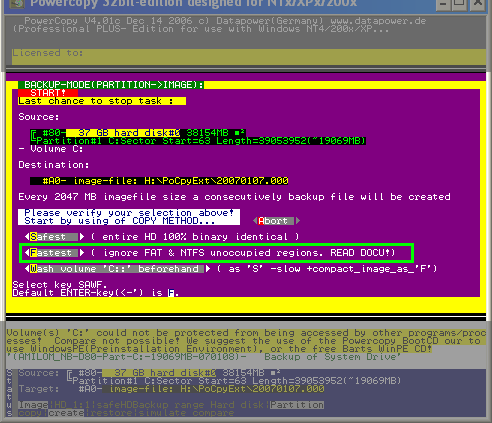
The window "Last abort option" will appear; check the entries made for Source and target; if everything is OK, you may select one of the following copy modes:
"F" New in V4 Turbo-Fast - in this case only the allocated sectors are saved, depending on the corresponding file systems (such as FAT, NTFS..) used;
Tip: Perform a Scandisk before you use this mode, to ensure that the file-system of partition to be copied is free of errors.This Option is not available for the Pc.exe
DOS-version of Powercopy"W" Before the copy process is started, the data trash of the free areas is overwritten with characters resulting in a imagesize runtime close to copy mode "T", although a 100% bit-by-bit method backup mode is performed (If the percentage of allocated areas is above 70%); Images created are as compact as using 'F'-mode. If you fail to enter anything, Powercopy will select Copy mode "F".
By entering the copy mode, the backup process will start.
The window with the current copy dialog will appear:
End of backup process: "OK" will appear, or "Error"; if the Error message appears, refer to "A" (Show
the program quick help topics);
|
3.1-D: Creating an image via a network share: [Top Of Page] |
Peculiarities only in the case of Professional versions when transfer takes place via network share
Setting up a network share:
Preparation:
Destination storage:
The directory in which the image file is to be stored must be shared with the network.
(Right-click the directory, select "Sharing.." and enter "Powercopy" as Share Name; share directory);
Set the permissions of the shared folder to read-write (full) access.
In case of the XP Home edition, check the "Allow network users to change my files"
XP Home Edition
Win 9x/ME
XP professional
You need to map the shared folder on the computer on which you run Powercopy. We suggest to map shared folder as drive X:
Map a folder. Method A

|
1. |
Click My Network Places, and then click Entire Network. |
|
2. |
Click Microsoft Windows Network. |
|
3. |
Click the name of the workgroup you created when you set up your home network (most likely Mshome); then click the computer that contains the shared folder . |
| 4. | Right-click shared folder Powercopy;
select 'Map Network Drive' |
| 5. | Select Drive letter 'X:' |
Map network drive. Method B Command line method (works with every MS operating system)
1.
Click Start -> Run -> enter cmd (Enter Command on Win 9x/Me)
2.
Enter "net view " The list of computers of your workgroup will be shown.
3.
Enter "net view \\<computer name>". <computer name> is the name of the computer, on which you shared the images. Enter without brackets
4. Enter "net use x: \\<computer name>\Powercopy 5. Drive x should now be available to use.
If you cannot save on x, you failed to give the read-write permission.
See also Microsoft articles:
http://www.microsoft.com/technet/prodtechnol/winxppro/maintain/filesharing.mspx
http://support.microsoft.com/default.aspx?scid=kb;en-us;301281&sd=tech
4. Same procedure as under B, with the exception that drive disk "X" is selected, followed by selecting the previously defined Directory. Here you may call up a more detailed instruction sequence.
| 3.1-E: diskcopy
or 'creating image files' via PC direct data link [Top
Of Page] (only in Professional PLUS and MULTI-CLONE Versions) |
Precondition: Use Powercopy special cable to connect both computers;
Computer-A Powercopy Kabel Computer B by use of the
Powercopy cable3.1-E1: A 1:1 copy of a hard disk via PC direct connection [Top Of Page]
(starting from dialog entry on source computer)This special backup method is only available in the PLUS version via Function "F" - Further functions - . Select "C" Copy - .
The dialog entries for selecting the source are as previously described. Once you selected the source, proceed as follows:
4. Selection of target hard disk
Since the target hard disk is located on the other computer which is connected via the PC-to-PC direct connection cable, first select the line for the connection of the other computer by clicking on " #??: HD/Image of the other computer..."; this computer, too, must be started using Powercopy and in the Further Hard Drive Functions Menu, function "V" 'Set to Receive mode' must be selected on this computer (set this size "to receive"); An overview of the hard disks installed will appear on the source computer. Select the proper target hard disk.
Here you may call up a more detailed instruction sequence.
Computer-A Powercopy Kabel Computer B by use of the
Powercopy cable3.1-E2: Creating images via PC direct cable connection [Top Of Page]
(starting from entry of dialog on source computer)
This special backup method is only available in the PLUS version via Function "F" - Extended functions - . Select "C" Copy - .
The dialog entries for selecting the source are as previously described. Once you selected the source, proceed as follows::
4. Selection of target hard disk/Directory
In the same manner as in procedure E1, first select line " #??: HD for making a connection to the other computer...". The hard disk data are then transferred from the other computer. First select line "#Img: image-file..." in order to select the file on which the image file is to be saved. From this point on, the procedure is the same as in the case of procedure B, C or D.(Creating an image via network).
Here you may call up a more detailed instruction sequence.
Computer-A Computer B via network 3.1-E3: Copy a hard disk 1:1 via a LAN network [Op of Page] NEW in V4.0Rd! 1:1 Backing up (Cloning a hard disk without the necessity of opening a computer! Example: in case of a system change. HD-PC1 -> LAN -> HD-PC2 Only upwards of Professional Plus version.!
This is how it works
Boot computer using Powercopy Boot CD:
Boot both computers using Powercopy Boot CD. Start network connection on both computers (Menu 2 of 3). Start Powercopy on both computers.
Within Windows:
Select Option 1) "SourceHD->Image" on computer A, and on computer B-TargetHD- Option 4) "Image -> HD".
Enter <Network drive letter>:\HDVIANET.000 and start both sides.
No real image will be created on the network, only about 1 MB of buffer memory will be used.
Now relax and take it easy! If you use the fully automatic option of Powercopy, the copy process may be performed by the user without further entries.
3.1-F: Peculiarities in using copy function "B" (Backup ) or "R" (Restore) [Top Of Page]
(only for Professional PLUS and MULTI-CLONE Versions)This backup function is used to save a 1:1 copy of a hard disk on a second hard disk and to maintain two important safety features at the same time.Procedural safety as a result of a number of checks to make sure an unintentional overwriting of a hard disk is ruled outThe target (Backup) hard disk has been identified and protected in such a way that neither the operating system nor a common application program will have access to the hard disk with the system running.Preparation: The target (Backup) hard disk must be identified by "E" and another parameter "P" (for preparation) so that the first ten sectors of the target hard disk are reserved. Only after this step, will the data of the source hard disk be written.
You will find a detailed description in the Powercopy "Marking_Backup.htm" file which gives a fundamental description on IDE hard disks.
Procedure: This feature is only offered in the PLUS version and may be called up via the Functions Menu, point "F" - Further hard drive functions -. The process sequence is the same as in the previous examples mentioned, except that Function parameter "B" for Backup and "R" for Restore must be used for this special copy function..
Here you may call up a more detailed instruction sequence.

3.1.2 Restoring of hard disks/Image files [Top Of Page]
When restoring image files in which the Start Operating System is located, you must start the computer using the DOS Live-start(Boot) CD or any other Windows XP/2000/2003/Vista compatible Live-start(Boot) CD or the "Security Check CD" from Microsoft which came with the package.It does not matter whether the image contains the data of an entire hard disk or just of a partition (drive letter), since Powercopy restores this image file to the original area.Restore of an image which was created using function "1 HD -> Image":
- Start Restore
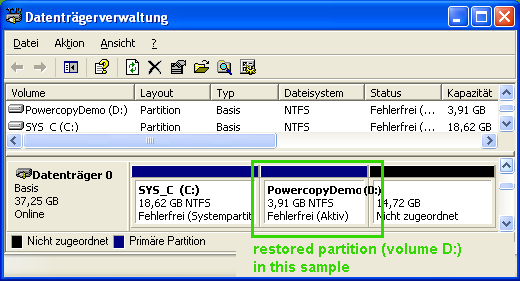
Sample restore of an image which was created using function "2 Partition -> Image":
However, if you wish to restore the partition on a new hard disk or another hard disk area, a selection menu will appear in which you may select the target areas:
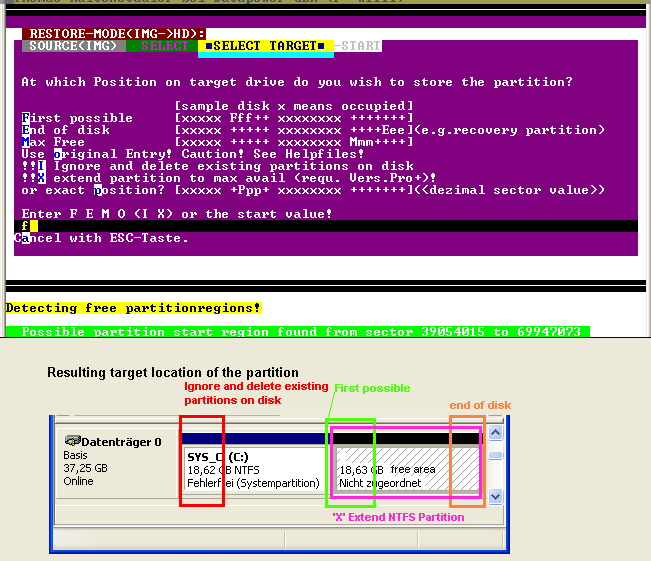
Default value is 'F' which is the normal way to add an partition to disk.
Use 'I' to do like a restore on a new disk. All existing partitions will be cleared.
Use 'X' if you want to maximize a partition containing a NTFS-filesystem. Partitions can also be expanded by use of diskpart.Sample disk layout after restore using 'F'.
here you may call up a more detailed instruction sequence
3.1.2.3 Special case: Restoring of an image with adaptation of partition size to existing entry.
From Powercopy V4.2 upwards: If you intend to adapt an image to the size of an existing partition entry, you may do so with parameter 'R:<start sector of partition to be replaced>'. This parameter may be set in the restore dialog. NFTS may both be reduced or enlarged. FAT partitions may currently only be reduced. Reducing an existing partition will not always be possible; in any case, the partition to be restored needs to be defragged. A reduction in size may be implemented only up to the highest used sector of a partition.
FAT storage media of a hard disk partition or a partition image may only be reduced.3.1.2.4 Special case (supported from V4.2 company license type): Restoring of an image without changing the MBR entry
Ideal if a system bios or hardware card (like the Reborn Card PCI from Signal Computer) protects the Master Boot Record .
If you do not want to change an existing partition entry and wish to adapt the new partition to an existing entry without modifying this entry, you should use parameter'Rn:<start sector of partition to be replaced>' instead of parameter 'R:<start sector of partition to be replaced>'. This parameter may be set in the restore dialog and will be available from our 'company license type' upwards. See also here: Reborn PCI-CARD
3.2 Comparing source and target data [Top Of Page]
The source data (e.g. hard disk) may also be separately compared with the target data (e.g. Image file). This operation may be performed in the Further Hard Drive Functions Menu accessible via Function "F".
Function "M" (Compare) must be selected for the separate comparison operation. The procedure is almost the same as for the other functions.
To call up this function makes only sense if you want to check whether the data on the hard disk/Partition have changed. This function was designed mainly for PC vendors.
Example: You wish to copy a hard disk as an image file and then back again to a second HD. After copying your data to a second disk, you may perform a separate compare operation with your master (original). Because most of the time no errors on a compare will occur, this may save time e.g. if you are in a hurry!
Here you may call up a more detailed instruction sequence.
3.3 DOS procedure [Top Of Page]
Powercopy's user interface is designed in such a way that, when booting takes place in DOS mode, the logical procedure is basically similar to the instructions in MS Windows mode.
The CD which is included in the delivery package may also be used to boot the computer in DOS mode. If a Restore of a partition is performed which contains the Start Operating System, booting must be performed with the boot CD. Many users, however, use the DOS mode in booting, because this mode of operation is often distinctly faster.
Important information using DOS: External USB or Firewire hard disks must not be formatted with NTFS, because creating images will not be possible on these data media! You can easily format a hard disk to FAT32 by using our template images located on the Powercopy BootCD.
Important note on copy speed
If the copy speed is less than 8 MB per second, you may either enable the UDMA driver inside the "Options Menu" or do the copy on a system which has native Int13ext Biogs UDMA support (normally all devices manufactured after 2000). Another simple way is to insert an ATA/SATA controller with UDMA Controller Bios Support (e.g. by Promise). This even works on more than 10-year old computers.
As an average, normal copy speed is higher than 20 MB per second or 72GB an hour. A disk-to-image backup made on an external drive should be performed at a rate higher than 10 MB per second.
You will get the best copy performance, if you save this image on a second, internally installed hard disk.
Procedure:
1. Insert Boot CD into drive
2. Start computer; The following BOOT MENU will appear:
******************************************************************************
VX.Y Powercopy Boot Menu 1 of 3
******************************************************************************
I would like to boot this computer and I need ...
(used drivers)
1** a default boot (UMBPCI runs on almost every system)
2 =1+ support for USB2.0 harddisks, memory sticks (USBASPI UMBPCI)
3 =1+ support for FireWire harddisks (SBP2ASPI UMBPCI)
---alternative, if 1,2,3 should not work on your system
4 a default boot [alternative] (UMBPCI LOWDMA)
5 =4+ support for USB2.0 hard disks, memory sticks (USBASPI UMBPCI)
6 =4+ support for FireWire harddisks (SBP2ASPI UMBPCI)
7 no memory area for drivers between 640k and 1MB (HIGHMEM only)
0 only an simple access to my system.(no Powercopy) (no EMM386, no HIMEM)
Select 1 - 6 if you want to use Powercopy.
The default selection is 1. (RETURN key)
2005 Copyright DATAPOWER Germany
******************************************************************************
A network connection can be established with options 1,2,3,4,5,6Select the type of communication. Normally code number "1" should be selected as the standard.
Select numbers 2 and 3 if you require access to an external hard disk. The driver names which are integrated during the boot start can be seen on the right side.
If booting does not proceed properly on your computer, then you have the option to select numbers 4,5,6 instead of 1,2,3.
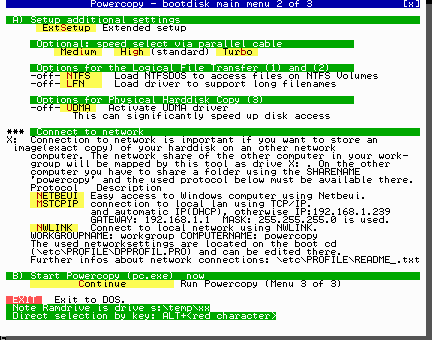
The following OPTION MENU appears:
A mouse support can be established pressing ALT+M key. Otherwise use arrow-keys to navigate.
Use NETBEUI or MSTCPIP button if you need to establish a network connection to a Windows network.
(see "Connect to windows network using DOS" below)Click on "Continue".
The Powercopy function menu will appear.
From this point on, the procedure is largely identical with the previously described procedures!
Connect to windows network using DOS:
If the backup functions (creating an image and Restore) are to be performed via a network, you need to select the required network protocol "Netbeui", "MSTCPIP".
We suggest to use the 'NetBeui' protokoll(fastest mode, less connecting problems). It may be required to be additional installed/enabled at Windows side.
Important note if you are using TCPIP protocoll:
If the shared folder resides on an XP/200x client and the Powercopy copy speed is less then 3MB/s, you should install the 2000/XP_Patch located inside folder FAST_DOS_TCPIP_to_XP_Server on the Powercopy BootCD.
The following process takes place for the network connection:
Window "Running Network Client" : Normally select "OK".
Window "Profile OK": Normally select "OK".
Window "Autodetect your network adapter": Normally select "Auto". In the event you are asked where the updated list of network interface cards is to be saved, select RAMDISK.
If dialog "Please select which adapter to use" should appear, then multiple network cards were found. Select the appropriate adapter.
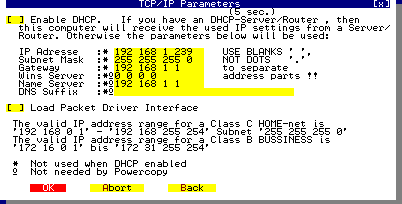
If you selected "MSTCPIP network protocol", window "TCP/IP Parameters" will appear.
If there is no DHCP Server in your Network available, disable the DHCP checkbox, enter the required network addresses and select OK.
Be sure that in case of a SW or HW firewall the entered IP Address is enabled by firewall settings.
Additional information on this subject can be found on our Internet Powercopy FAQ Help pages; activate or deactivate DHCP;
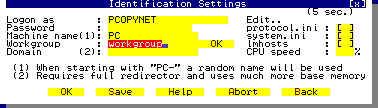
Then window "Identification Settings" will appear:
Here, enter your Windows work group name: E.g. Mshome is likely to be the name and select OK.
If the network connection was successful, the option menu will appear again. If this is not the case, the network connection was not successful (For more information, see www.datapower.de / FAQ).
Powercopy (Pc.exe) will automatically start when clicking on "Continue" .
From this point on, the logical procedure is the same as described previously for the MS Windows mode.
Here you may call up a more detailed instruction sequence.
Instead of starting with DOS, you may also start the computer with Microsoft's "Security Check CD".
This CD offers the advantage that hard disks/partitions which have been formatted with NTFS will
also be processed.
TIP: As an additional feature this option allows you to use the turbo-fast cluster scan, even if you clone a hard disk using an older operating system such as DOS/Windows 95/98/Me or if you intend to save an image.
The operating sequence is as follows:
- First determine on which drive the Powercopy pc32.exe runs. Note the exact path, e.g. C:\programs\Powercopy\pc32.exe;
- Place enclosed Microsoft's CD "Safety in the net" in the CD ROM drive and start computer
- A request will be shown "Press any key "; press the space bar within two seconds!
- Windows PE starts from the CDt. Wait until the window
"Microsoft Licensing Agreement... " will appear. Select "I accept" then click "continue ".
- Wait until the Tools window appears to remove malicious software.
Abort the window (do not click on OK).
- The window "End user License Agreement" will be seen. Click on "Cancel".
- Then the window "The safety check....has been completed" will appear. Press
Alt + Tab keys.
- The entry field "cmd.exe " with c:\>;
Enter the exact path noted at the beginning. Based on above example:
c:\programs\Powercopy\pc32.exe and click ENTER.
- Powercopy now starts under Windows PE (in the memory, as under DOS). The Powercopy
Functions Menu will appear.
From here, the operation sequence is identical with the previously mentioned instructions.
3.5 Additional functions of Powercopy [Top Of Page]
Depending on the type of version, Powercopy features a number of additional functions:
This special copy mode is only available on Powercopy's PLUS version via Function "F" - Further hard drive functions". Select "E" Erase -
3.5.1 Erasing hard disks/hard disk areas [Top Of Page]
The dialog for selecting the source is identical with the previously described procedure. As soon as you selected the target, proceed as follows:
By selecting function code "E" in the Functions Menu, Powercopy provides a range of erasing and identifying functions.
First select the drive on which you intend to perform a delete operation.
Window "HD-Clear... information" will appear. Read this text.
Then a window with the individual erase and highlight functions will be seen.
After entering "O", an overview of the partitions will appear. Here you may select a partition, then press ENTER. The area to be erased will once again be confirmed and after clicking on OK, the message "Last abort option" will pop up. You may cancel this request by clicking ESC. If you press "w" or ENTER, the operation will be performed!
If you enter "C", the partition area will be erased sector by sector, but the Master Boot Record entry will remain the same. By entering "p", you may then change the partition. This is sort of a "data shredder" which will erase the entire partition area.
By entering "M", the entire Master Boot Record will be erased.
All partitions/volumes will be erased in one go. However, the partition content will not be affected. It's as if you were to use the hard disk management tool to erase all partitions. In this manner, you may also cancel the marking for a Backup.
If you enter "F", the first 20 MB of the Master Boot Record will be erased
If you enter "E", the entire hard disk will be erased!!
If you enter "P", a hard disk will be identified as Backup disk. This function is also very useful to identify a hard disk as free (for example, if you wish to clearly differentiate between source and target hard disk in the case of a hard disk copy with the same size as the original hard disk) .
It is only after you confirm the dialog "Last abort option", that the corresponding function will be carried out!
3.5.2 Simulation of standard copy processes without write process on hard disk or determining size of image file [Top of Page]
In order to become quickly familiar with the copy process options, we suggest that you begin by "simulating a backup" by clicking on "D" in the Functions Menu.
Using this function, you may perform all copy modes in the dialog using real conditions, without any data being written onto the hard disk! After selecting "D" and clicking the ENTER key, you will see a message at the lower right-hand corner saying "SIMULATION MODE IS ACTIVE". Then select a Copy mode.
The operating sequence is the same as if you'd perform an actual copy operation. At the end of the test run, you will get the size of the image, for example, and a so-called job file is saved in the directory selected. If you pull this file using "Drag and drop" (left mouse key) to "pc32.exe" (only possible on the PLUS version, in connection with the batch process automation), the actual copy operation starts.
You may also determine the image file by clicking on or entering "F" to get to the Further hard drive functions Menu and then selecting "D"


3.5.3 "Washing" hard disk [Top Of Page] In order to drastically reduce the Image run-time and size of the Image, the data trash which still exists in the free areas may be overwritten with similar and highly compressible characters. This procedure should be carried out from time to time. As a result, the free areas require only little space when creating an image file and the run-time is thus considerably reduced..
Procedure:
- Select "W" in the Functions Menu
- A window with information will appear; If OK: Press ENTER
- "Select drive (Partition)" will appear and "Please enter a drive letter". After selecting drive, press ENTER
- the partition will be washed;
Important Note:
If the drive to be washed is a compressed drive, then you need to deactivate the compression setting for the main directory (e.g. <drive>- Sub-directories may be set to compress function.
Drives with activated automatic compression setting cannot be washed under Windows 9x/ME.
How to proceed with Windows XP: select drive Icon; right-click; properties; On the General tab, remove check mark when asked to "Compress drive to save disk space"; click "Apply"; enter check mark on following dialog: "Confirm attribute changes" and leave check mark on "Apply changes to <drive>:\ only".

3.5.4 Information on hard disks connected [Top Of Page]
By entering "I" in the Functions Menu, you will get an overview of the hard disks connected. After selecting a hard disk and pressing the ENTER key, you will see a green window showing the partitions on it. Similar to this Dialog
3.5.5 Copying of several partitions (1:1 Copy, Image) [Top Of Page]
With Powercopy you may copy several partitions in one go. Make your selection in this case via Function "I" (Show information about connected HD's). After selecting a hard disk, the associated partitions will then be displayed.
After this procedure, select the one partition up to which you wish to make your backup. The backup process always runs from Sector Zero up to the end of the selected partition. Example: if you have drive letters C, D and E, and you select Partition D, then drive letters C and D are copied in one go (as 1:1 copy or as Image, depending on what you have selected). When restoring the partitions, they will be saved again on their original location. In this latter case, this would be drive C and D (refer also to Function key F1).
3.5.6: Providing hard disk with a protective shield / Use different operating systems on different hard disks [Top Of Page]
upwards of Powercopy V2.1RkPowercopy Professional-PLUS Version features a special function with the help of which a so-called protective shield can be layed upon a single hard disk containing a start operating system. In using this function, the partitions are made invisible to the operating system resulting in other applications not having any logical access to the file systems contained therein. Thus several operating systems may be used in parallel without interfering with one another.
Example: You wish to use a notebook both for private and business purposes. In order to separate your private from your business matters, it is a must to work with two hard disks installed. The first hard disk should be for business; the second for your private system. With the aid of the switchable protective shield feature, you may render visible or hide the partitions of the one or the other hard disk.
Procedure:
Start Powercopy
Select "I " for Information in the Functions Menu; press ENTER key;
The hard disk overview will appear;
Press Ctrl + F9; the protective shield function is thus activated;
Once again, the hard disk overview will appear; by using the arrow keys, select the hard disk upon which you wish to apply the protective shield and press ENTER, thus activating this function. At the beginning of the second line of the hard disk information, "Shield " will be shown for the drive. This hard disk is now protected by a protective shield. Thus no booting is possible from this hard disk.
In case you wish to switch off this function again, the same procedure applies. This will result in the protective function being turned off and the word "Shield " will be replaced by the original text (change-over function).
In order to turn off a hard disk and to switch on another one, the procedure must therefore be carried out twice.
Make sure that the Master Boot Record is not protected in the BIOS.
This function may also be activated using the script file.
Example of application: Notebook with emergency hard disk! The second hard disk is to serve as a Backup of the first one. If hard disk (#1) fails, the reserve hard disk must be activated immediately.
How to proceed:
A) Copy hard disk #1 onto hard disk #2 by using Powercopy (1:1 copy).
B) Immediately following the copy process (Important: Do not boot again), you must protect this hard disk # 2 by using the protective shield function.
The computer may now be booted as usual. Hard disk #2 is now protected in such a way that it will not be affected by the running operating system. If hard disk #2 fails, you can boot the computer by using the Powercopy BootCD, protect hard disk #1 and reverse the protection of hard disk #2. Now boot your system from the second hard disk. You may have to make an adjustment to this effect in the BIOS.
Important information:
Depending on the BIOS available, the corresponding boot disk must be set in the BIOS, such as is the case in older systems, if it cannot be set by means of a Function key (F12 key in Phoenix Bios). Example: Enter the hard disk in the BIOS from which you boot and which has no protective shield in the BIOS.
Be sure to perform a number of tests to see if the reversion takes place safely and automatically before you use this procedure.


4. How to Proceed in the Case of Defective Hard Disks/Defective File Systems [Top Of Page]
Before trying to restore a file system with Recovery tools, it is absolutely essential that you back up BEFOREHAND the hard disk with Powercopy (1:1 or HD-> Image) using the BootCD. Thus the original status (before a Recovery tool was used) may be used as basis for a renewed restoration effort in case the Recovery tool fails!
We highly recommend that you perform this procedure and boot using the Powercopy BootCD. For experts only: As an alternative, you may also boot from a Windows XP-PE (XP-Preinstallation Environment) or a BartPE CD or a second hard disk, followed by this type of backup.
If you do not wish to start using our boot floppy, you may also boot from your own boot floppy/BootCD. You will find more information on creating your own boot DOS floppies on the Internet using the Google search engine (for example: http:\\www.bootdisk.com).
6. Creating Batch Processes [Top Of Page]
You may automate the copy process with Powercopy Professional PLUS versions.
Note:
When using Powercopy backup functions under Windows NT4/200x/XP, an <ImageName>.job"-file will be created shortly before the dialog "Last chance to abort" appears.
You may use this file as basic file.
By using parameter /imgf <Imagefilename> an image file name may be specified which may be used as a source image name or, depending on whether you with to create an Image-to-hard disk copy or a hard disk-to-image copy, as a target name.
Example command line usage:
pc(32).exe /hdinfo <DRIVELETTER:\PATH\FILENAME.job> /imgf
<DRIVELETTER:\PATH\FILENAME.000This documentation is also available on the Internet: http://www.datapower.de/scripts_eng/index.html
Also check http://www.datapower.de/english/pc_faq_hd.htm
7. Error Messages/Command Instructions [Top Of Page]
By selecting parameter "H" (Display of program parameter Help text) in the Functions Menu, you will find more information on command instructions, parameter Help and Error Message codes. You may scroll by continuously pressing the arrow key or ENTER key. You will find additional information on www.datapower in the Support FAQ area.
7.1 Information about external USB2.0 drivesThe error message 'Error at BIOS Int13ExtRW: hard disk....' stands for read error and points to a defective hard disk drive/connecting cable! Replace immediately!
However, if this message appears as early as during the start of Powercopy, when using the DOS Boot CD and in conjunction with external drives, the cause may also be a USB/1394 driver/BIOS conflict. In this latter case, just connect the external drive after the Boot Menu has appeared.
Unfortunately the USB2.0 interface is so poorly designed that it will always be very difficult for USB2.0 device manufacturers to fabricate equipment that will function in all kinds of situations.
Therefore we would like to share with you our experience in connection with our Boot CD:
Information about external USB2.0 drives
Brand-name devices such as from Iomega were always operating trouble-free in our job environment and are most of the time faster than No-Name equipment. The 2,5" Pocket Hard Disk Drive from ST Lab performed trouble-free. However, the Revoltec(PA-917 REV2.1 CS881BAG) did not work trouble-free in all kinds of situations. We most urgently appeal to you not to use any low-priced equipment.
Information about external USB2.0 controllers
PCI: We highly recommend USB2.0 Controllers with NEC chipset
Notebook PCMCIA CARD: We highly recommend PCI USB2.0 Controllers with NEC chipset.
Conclusion: To save money on equipment may often mean frustration!7.2 Formatting an external hard disk
IMPORTANT! We suggest to use an external hard drive (USB2.0 / SATA) to store the Powercopy image files there.
To archive highest comfort and most process security creating and restoring imagefiles you should format your external drive by use of the hard disk quick formatting feature( Ctrl + F10) of Powercopy.
Quick hard disk formatting feature (WINDOWS NT/XP/Vista/2000/2003):
Upwards of Version 4.0 of Powercopy, it is easy to format hard disks of any size with FAT32 by using the key combination Ctrl + F10.
Press Ctrl+F10 in the Functions Menu; a window will pop up where you are once again asked if you wish to format a hard disk. The following sequence is process-supported, as we already know from the backup process and functions basically in the same manner as a backup operation.Advantages if an external hardisk has been formatted by use of this Powercopy Quick hard disk formatting feature:
- A folder named PwrCpyExt is always created after formatting hard disk (default storage file location for Powercopy image files, required for '+'-key and dropdown file selection feature above))
How to use:
function to determine which drive to format. (0x80 0x81...)
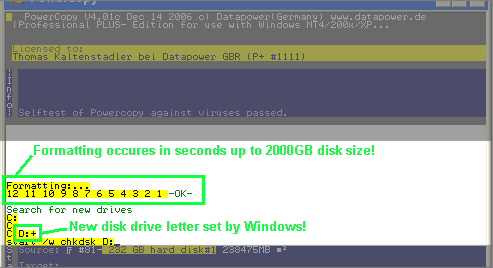
During formating:
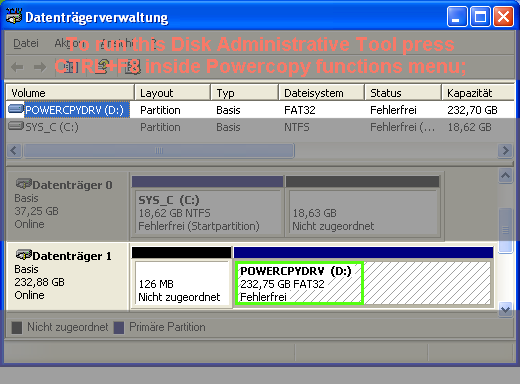
After formatting:
Disk administrative tool and windows file explorer will show the new drive.
Drive (D:) at this example.
Formatting an external drive under Windows 98SE and Windows MECreating a partition is not easy to handle within Windows 98SE and Windows ME.Tip! Connect hard drive to a Windows XP/Vista system and use the Powercopy key-combination Ctrl+F10 feature.
See Ctrl+F10 aboveHard disk quick formatting, the fastest and safest method
Windows 98SE: The FDISK Version which was installed with your operating system is not capable to recognize hard disk sizes beyond 64 GB.
Windows 98SE/ME: Inaccurate display of large partitions, but the partitioning result is OK.
Erasing a partition from external drive
"Start".-> "Run".->Enter "fdisk". Click OK. FDISK is started. Question: "Enable Large Disk Support?" Confirm by pressing ENTER. FAT32 is now activated. Select Option #5. (Change current hard disk). Select the number of the hard disk to be erased. CAUTION: Make sure the correct drive is selected. Failing to select the correct drive will cause permanent loss of data! Select #3 (Erase Partition or logical DOS drive). Erase all partitions available. Normally only one is present. Continue to press ESC until you are back in the fdisk Main Menu. Select 1 (Create DOS partition or Logical DOS drive). Choose number 1 (Create Primary DOS Partition). Follow the instructions. Leave fdisk by pressing the ESC key. Deactivate external hard disk by clicking on the Windows "hot unplug" icon in the System Tray (lower right-hand side of screen), and disconnect the connecting cable to the external hard disk.
Re-connect the connecting cable. Perform formatting of the newly created partitions:
Double-click My Computer on the desktop . Select the unformatted drive. Open the Context Menu by right-clicking this drive icon. Choose "Formatting". You should enter "PoCpyExt" as the volume label.
Important! A drive formatted in this manner with the Powercopy >Version2.1 DOS BootCD will automatically be found! Beyond that, an additional advantage is that you can identify it much easier under Windows. After having completed you selection, click "Start".
CAUTION: Selecting the wrong drive will cause permanent loss of data. Be sure you selected the correct drive. Confirm the next message by clicking on "OK".
After the formatting operation, you may check the drive using the ScanDisk function. The external hard disk is now ready for use.Tip for DOS Windows 9x/ME!: A range of images for various partition sizes, i.e. 80 120 160 250 320... for fast formatting of external drives with Powercopy can be found (for Win 98/ME, Win2000/XP) on our download area.Use Windows NT/200x/XP(Vista) for formatting, if available.Formatting of an external drive under WINDOWS NT/XP/Vista/2000/2003Under XP/2000 FAT32 drives can only be formatted up to 32GB (there was a time, when Microsoft could do better)
New in V4 Ctrl+F10 Hard disk quick formatting with FAT32 file system. Only pc32.exe within NT4/200x/XP and lately also possible with the "Safe in the net" XP-PE Boot CD, even though with restricted operability.
In this case a directory entitled PoCpyExt is created and the hard disk is signed in such a way that Powercopy will not overwrite it without issuing any warning.

8. Typical Applications [Top Of Page]
The backup functions available may be used in a number of different ways.
Main applications may be as follows:
- Creating a backup of a hard disk to back up data and to ensure speedy work resumption by restoring an image or by starting from the backed-up hard disk.
- Cloning of master sample installations for similar application PCs (for example, if you acquired multiple licenses)
- Backups for Server
- When buying a new compute, the data of the hard disk of the old computer can be transferred completely onto the new computer. The old computer may also be used as an ideal backup computer for Image files. Image files may be saved on the old computer either by using the Powercopy's Function "PC direct cable connection" (Powercopy cable available only for the PRO-PLUS VERSION) or by installing a network interface card!
- Backing up hard disk, such as in the case of a Headcrash. Before trying to restore a file system with Recovery tools, it is absolutely essential that you back up the hard disk BEFOREHAND with Powercopy (1:1 or HD-> Image) using the BootCD, thus the original status (before Recovery tool was put into service) may be used as the basis for a renewed restoration effort in case the Recovery tool fails!
F1 HELP for active dialog window (not available for all dialogs)
F2 Change drive letter in the case of file/directory dialogs only for DOS/9x/ME)
F5 Switch between German/English dialogs
(this feature is available only in the Functions Menu)
F7 Load Windows drive letter assignment
(optional when staring DOS version, not available for
Windows NT/2000/XP Vista, since not necessary)
ALT+F2 Stop Powercopy temporarily
ALT+F4 Abort Powercopy. (If two computers are connected by
means of a Powercopy cable, it may be necessary to
press Alt+F4 several times.)
(pc32.exe) CTRL+F6 Create shortcut on Desktop / include in Start Menu
(Ctrl+ALT+'P' starts Powercopy) New in V4
(pc32.exe) CTRL+F8 Call up Disk Administrator. New in V4
NT4 (diskadmin.exe)
200x,XP and later (diskmgmt.msc)
CTRL+F9 Switching hard disk protective shield status ! READ DOCUMENTATION!!!
(pc32.exe) CTRL+F10 Hard disk quick formatting with FAT32 file system.New in V4
Ideal in connection with Powercopy! READ DOCUMENTATION!!!
Further information is available at www.datapower.de.
Support E-Mail address: support-hotline@datapower.de
Datapower GbR, Florianweg 11, ZIP 86368 Gersthofen Germany